
My daughter turned six last week! And she loves to swing. I thought it would be a nice birthday present to make a swing for her. In this article, you can read how we created this DIY swing set.
DIY swing set Douglas wood
First of all, the choice of wood is of course important. Which wood do you choose, how solid should it be and how big should the swing be. I wanted a three-meter wide swing, so our choice fell on planed Douglas fir wood measuring 120 by 120 millimeters. In addition, we used supporting beams, again made of planed Douglas fir wood, measuring 150 x 50 mm for extra strength.
We miter cut the support beams into four pieces of 1 meter. These are later placed on the sides of the swing.
Step 1: Buy wood
Shopping list Douglas wood for DIY swing set
- Three beams of planed Douglas fir, 3 meters long, 120 x 120 mm
- One beam of planed Douglas fir, 4 meters long, 150 x 50mm
Step 2: Treat wood
To keep the swing healthy for as long as possible, it is important that you treat the part that will be buried. I have opted for treatment with black carboleum. This protects the wood and prevents it from rotting.
I treated the two standing posts of three meters at the bottom of 80 cm with this protection layer. The support beams have been treated on the base about 40 cm. In total, I painted all beams three times.
Shopping list to treat the wood
- Can with carboleum (tar)
- Brush
- Optional gloves

Planed douglas wood

Carboleum (tar)

Treat wood
Sturdy swing set
Of course, it is the intention that the swing is sturdy, after all, it’s going to be used fanatically.
Step 3: Make a swing set frame
For the frame of the swing set, we dug two holes about 80 centimeters deep, of course, large enough to place the standing beams. First, throw some stabilized sand at the bottom of the hole and place a flat stone on top (for example a piece of curb). Place the beam on top of this and fill the hole step by step with stabilized sand. Do not fill the entire hole in one go, but make sure you tamp it well in the meantime, for example with the underside of a broom. Pour in some water as well, so the sand settles extra firmly. Do not forget to measure with a spirit level whether your bar is straight, it cannot be corrected once you are done.
After the first standing beam, the second follows in the same way. So dig another hole, put stabilized sand in it, put a stone on it, and then place the beam. At this point, it is important to measure whether the tops of the standing beams are even. You can measure this or use a plank or beam with a spirit level. When you are satisfied, you can finish filling the second hole with stabilized sand.
You make stabilized sand by mixing masonry sand and masonry mortar in a ratio of 10: 1. Obviously, I exaggerated a bit with my masonry mortar, I believe it just can’t be strong enough.
The posts will eventually be about 70 centimeters in the ground, leaving 10 centimeters of tar visible.

Dig a hole about 80cm deep

Place a stone in the hole

Tamp the sand thoroughly

Masonry sand

Masonry mortar

Create stabilized sand
Step 4: Place the top bar
The next step in making your DIY swing set is to install the top beam. Carefully place the top bar on the standing beams. Cover the tops of the standing bars beforehand with wood glue. This ensures the beams stick together a bit, but more importantly, it makes the bars and seams watertight. After you have covered both standing bars with wood glue you can place the top beam. Check that it is perfectly straight and secure it with two corner anchors.
Shopping list for a sturdy swing set
- Five bags of masonry sand
- One bag of masonry mortar
- Two pieces of curb
- Wood glue
- Two corner anchors of 90×90 mm 60×2.5mm galvanized

Place the top bar

Attach top beam with corner anchors
Extra sturdy DIY swing set
In principle, this construction should be sturdy enough for the swing set, but I’m an overachiever and like an extra sturdy swing set, so we added support beams to our design.
Step 5: Attach the support beams to the swing set
Dig a wide hole about 40 centimeters deep on either side of the standing beams. Place another piece of stone in it and place the support beam on it. Make sure the support beam fits tightly to the standing bar and if satisfied, treat the end side of the support beam with wood glue (prevents moisture in the seams) and attach it with a corner anchor. Fill the hole the same way, with stabilized sand and the last layer with regular sand to keep your garden nice and tidy.
A point of attention when placing the second support beam is that you have to make sure the support beams are attached to the upright at the same height. This is not specifically firmer but mainly looks better. Just some eye candy.
Finally, you can screw an extra, long, screw into the support beams to keep it permanently in place. You can place the screw about four inches from the top in the center of the support beam, screwing it straight into the support beam. So it’ll be diagonally in the standing bars.
Shopping list swing set support beams
- Four pieces of curb
- Four galvanized chipboard screws of 6 x 120
- Four angle irons

Four support bars

Place support bars
Step 6: Fix top bar permanently
At this point, the top bar is just attached with some wood glue and two corner anchors. To ensure that this beam can go nowhere, we attach the beam with a sturdy U-shaped hook. For this hook, I had a steel mounting lath of 1 meter long, 2 centimeters wide, and 6 millimeters thick bent by a blacksmith to the correct size, so that it fits exactly around the 120 x 120 beam.
We place this strip at the corners around the top beam and screw it on with four bolts on both sides. Pre-drill the holes before screwing in the bolts.
Shopping list mounting strip
- Two mounting strips of 1 meter by 20 x 6 millimeters
- 16 bolts with body rings of 5 centimeters long, the thickness depends on the holes of your mounting strip
- Have the strip bent into the correct U shape by a blacksmith in the area

Attach mounting hooks

Pre-drill holes for swing hooks
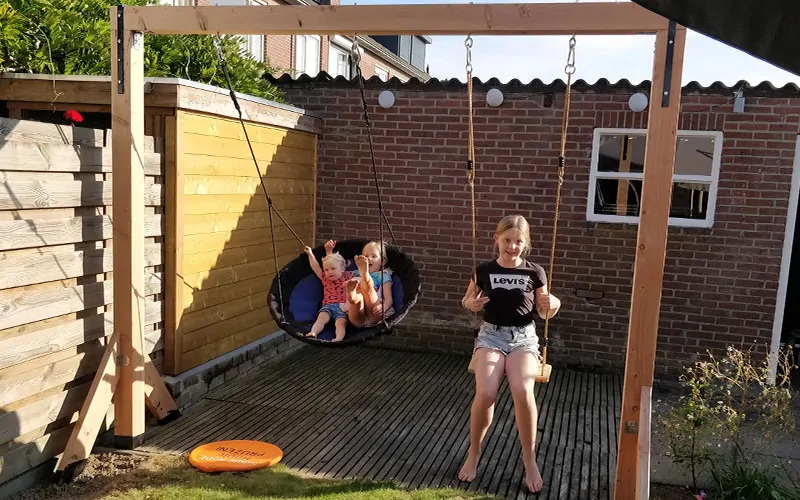
Hanging swing
The DIY swing set is almost ready. We just need to attach the swing hooks and hang the swings.
Step 7: Attach swing hooks
For our swing set, we bought a pine swing of 42 x 15 cm. The swing manual contains handy instructions on how far apart the hooks should be for safe swing fun. This calculation is the distance between the ropes (in this case 38 centimeters) + the height of the swing, in the example 2.5 meters x 0.04. The calculation is: (0.04 x 250) + 38 = 48 centimeters (or larger). My swing is slightly less than 2.5 meters, but I still kept 48 centimeters. It’s better to place the swing too broad than too narrow.
A nest swing of 1 meter wide will be hung next to this swing. For the space between the mounting hooks, we again consulted the manual and arrived at 75 centimeters.
Since the nest swing is wider than the hooks (after all, the ropes are not hanging on the very tip of the swing) we have attached these hooks a little further inwards than the hooks of the regular swing.
The total length of our swing is 2.60 m.
The distribution of the hooks is: 45 cm between the swing and the standing beam | 75 cm (nest swing) | spacing between the swings of 57 cm | 48 cm (regular swing) | 35 cm space between the swing and the standing beam.
I bought four sturdy swing hooks with a nylon bearing. To fix these, we first drill a hole in the top beam at the points I described above. After drilling the holes, turn the hooks into the wood and secure them on top with two bolts (supplied with the hooks).
Shopping list hanging swings
- Pine swing 44 cm wide
- Nest swing of 1 meter in diameter
- Four bearing swing hooks made of galvanized steel with nylon bearing
Step 8: Finishing DIY swing set
Then it’s just a matter of hanging the swings and voila. Your DIY swing set is ready. Have fun swinging!
DIY Swing set parts
I will sum up the shopping list in total. Very convenient. In total, I paid 150 euros for the swing. But I still had some materials lying around, I didn’t buy any masonry mortar, for example, because my father still had it lying around and I got free curbs from my neighbor.
Complete shopping list your DIY swing set
- Three beams of planed Douglas fir, 3 meters long, 120 x 120 mm
- One beam of planed Douglas fir, 4 meters long, 150 x 50mm
- Pot with tar
- Brush
- Optional gloves
- Five bags of masonry sand
- One bag of masonry mortar
- Six pieces of curb (so two curbs)
- Wood glue
- Two corner anchors of 90×90 mm 60×2.5mm galvanized
- Four galvanized chipboard screws of 6 x 120
- Four angle irons
- Two mounting strips of 1 meter by 20 x 6 millimeters
- 16 bolts with body rings of 5 centimeters long, the thickness depends on the holes of your mounting strip
- Have the strip bent into the correct U shape by a blacksmith in the area
- Pine swing 44 cm wide
- Nest swing of 1 meter in diameter
- Four bearing swing hooks made of galvanized steel with nylon bearing


